dyeing yarn

Creating repeatable colours – how I record my recipes

A big part of selling hand dyed yarn is being able to produce and sell the same colour. It’s one thing to create colours, it another to properly record recipes and be able to repeat the same results over and over.

There are of course dyers who only produce one of a kind colours, which is fun and creative, but this creates extra work in terms of shop photography and description writing. It also means that if the colour created is something beautiful and popular it is then difficult to go back and try replicate it. So even when I am playing around, I make notes as it could end up being something amazing.

When I started Passioned Flower my intention was to create colours that stemmed from the things that inspired me. I wanted to make colours that represented me and that I could repeat and build on over time. That is why even from the very beginning I recorded the process for each colour that I created.

[embedyt] https://www.youtube.com/watch?v=GkwiFbN-ngw[/embedyt]

So what is my process and how do I keep records to make sure I can repeat my colours?

It starts with the dye solution. Each time I make a batch of dye stock I use the same measure of powder to water ratio, I use warm water to dissolve the powder and mix it thoroughly before pouring it into their storage bottles. Next is the water in the dye pot. I measure the water and the vinegar into the pot, recording the quantities and other details, like if the water is heated before starting, or if I start with cold water. Sometimes I add colour to the water first, other times the yarn goes in and then the dye is added. All of these small factors can have a large impact on the end result.

At each step I write down what I do – in a notebook – I can write, scribble, draw images of how the yarn is laid out and on which sections I place dye. In some cases, when I have a very clear idea of what I’m going to do I may even pre-write out the dye steps and colour mixes and then adjust or edit these as I see how the yarn is turning out.

Often I will mix colours before adding them to the pot. As I have explained previously, I use only 14 dye powders and create colours by mixing the stocks together. Each new colour is written down, detailing the amount of each used.

At each stage I take photos and write comments on my notes. This has led to the creation of other colours, as sometimes along the way I create a colour that I would like to use for something else or in a different way.

Once I have finished dyeing, the colour is set and the yarn is dried. It’s really only after the yarn is dry that you can see the finished colours properly. This is when I knit a sample with the yarn (the same sample I knit for each of my colours). I decided that I wanted a slightly interesting pattern, so that one day I might be able to turn all of my samples into a blanket. I use the motif from the Bloom Shawl. It is a fairly quick square that shows off the yarn in lace and also in plain knitting. The sample is for a few reasons; to see how it looks worked up; to keep a record of the colour as reference for the next time I dye it and to use on my website as the colour swatch.
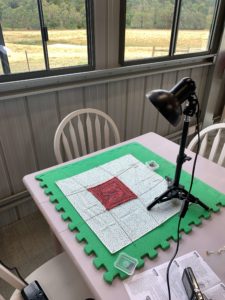
behind the scenes taking photos of knit sample swatches

At this point the colour may be finished and ready to become part of my range or I might want to try again, making some adjustments to get the colour just how I want it. Of course this then requires more notes, and another sample.

Once I am happy with the colour I then record all of the details in OneNote. Each colour is sorted into an inspiration category and has its own page where I list out all of the details that I jotted in my paper note book. I also upload photos and draw in diagrams using colours and arrows to record every detail I can about how I created the colour. The reason I try to make these as detailed as possible is because it might be a long time between dyeing up a particular colour, so in order to get it as similar as possible every detail and step needs to be done as close to the original version as possible.
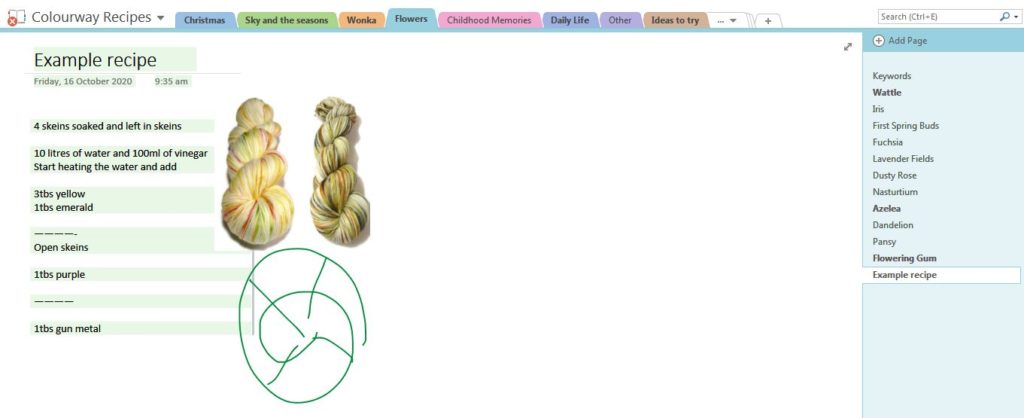
An example of how my recipes look in OneNote (**not a real recipe**)

When I am dyeing from a recipe, I use my iPad to read the OneNote files. I can set the iPad above my dye pots, so I can easily see it as I work. I can then also flick between recipes as each colour is saved by its colourway name. I keep my original paper notes safely in my desk, away from the mess of water and dye. Every scribble and note made it kept in case I ever need to refer back – either to double check that I am following the right steps or to use my notes to create something new.

Creating repeatable colours – how I record my recipes Read More »

Playing with colour – the inspiration and creativity of dyeing yarn

My process for creating a new yarn colourway is driven either by an idea or an urge to use a particular colour combination – from there my imagination, as well as my dyeing supplies, work together to achieve the end result.

Many of my colours are inspired by something I have seen in nature. A flower or a sunrise are perfect examples of things that spark my creativity. I know that if I can recreate those particular colour combinations that they will be visually pleasing as nature always gets it right.

One of my very first colours was Fuchsia. I saw the pretty little purple, pink & red flowers in my garden and thought I would try to make my own version on yarn. I had to think about the tone, the order and the amount of each colour to get the right balance.

But then there are colours that are more out of a need to fill in a colour gap in my range, wanting to create with a certain dye or a custom request. In these cases often it becomes more about looking at the yarn and the colours and combining what looks good. Then using the colour to inspire a name and back story.

A colourway that stands out that started as an experiment, that then became the catalyst for a collection, is Pure Imagination. I had an idea to try a particular way to dye a skein of yarn and I wanted to use a number of colours together. So I gave it a try. I rolled the skeins into spirals in my dye pan and just poured colours over different sections of the yarn, flipped the skein and repeated. I was not sure how the colours would blend, how much of the skein would end up with colour on it and if the combinations would work. The result was one of my now best selling colours. It also led me to create an entire Wonka series of yarns, that were all much more planned out and designed to be a set.

When I first started out dyeing I had only four colours of Jacquard Acid dyes (Pumpkin Orange, Purple, Periwinkle and Russet). These were part of a gift that started me on my entire yarn dyeing adventure. While I was learning it was fun to use these colours on their own and also experiment with how I could mix these colours to create many more. As I started to blend and create my own colours I researched the best dyes to purchase for mixing and different ways to dye yarn. A really interesting article by Space Cadet Yarn discuses their use of only primary colours in their dye process, and it inspired me to broaden my creativity by limiting the number of dyes I would work with. I think it’s very powerful to create your own colours and not be limited by pre-manufactured colours.

I chose a selection of primary colours (as listed by Jacquard):

Sun Yellow (primary)
Pink (primary)
Cherry Red (primary)
Sky Blue (primary)
Turquoise (primary)

And then added a few addtional colours to round out my collection:

Emerald
Teal
Brown
Gun Metal
Jet Black

I mix each colour to my own specific depth of shade (not necessarily according to the packet recommendations) and then mix these colours to produce my own end results.

Since then I have not added any additional powered dyes to my range and I don’t have plans to add any in the future. I like the challenge of blending my own colours to create something unique, it adds to the creativity and thought process of dyeing. I also believe that by limiting the dyes I use, even though my colours are all quite different, they fit together as they are created from the same 14 colours.

Playing with colour – the inspiration and creativity of dyeing yarn Read More »

Different Yarn Blends – Milk Fibre and Bamboo

As a hand dyer it is interesting to research and try out different blends. This can be to source new yarn bases for the shop or just to experience and experiment what is available.
I researched the origins and processes involved in bamboo & wool blends as well as yarns containing milk fibre. It was especially interesting to dye each of the blends alongside a wool nylon blend to compare the results.
First a little about these different fibres:

Milk Fibre

As the name suggests milk fibre comes from milk. It is created as a by-product of processing skim milk. A chemical process is used to extract, dry and then turn a powdered protein in to a fibre. It was first used during the 1930s and 40s to make wool and cotton go further. It is said to have anti-bacterial qualities and take colour very well (the protein in milk fibre was also known to be used in early outdoor paint).

Bamboo

Yes, the grass that Panda’s eat! The insides of the stems are processed down and made into a fibre, it has a shiny finish similar to silk. It gives strength when combined with wool, while keeping a drape and breath ability.

My Experiment

In order to test out the new blends I put all three in to the same dye bath (labelled with brightly coloured yarn that would not change colour) and did two different dyeing methods.
Batch 1
First batch I dyed up in Strawberry Shortcake (a repeatable colour that I already have in the shop). This was so that I could compare how the colour takes between my current sock yarn (Gumboot Sock) and the three new bases. Look how differently it comes out across the yarns!
LtoR: Gumboot Sock, 16% milk fibre/85% wool, 50% bamboo/50% wool, 60% bamboo /40% wool
Batch 2
Next I chose to have a play. I tried some shallow immersion dyeing and squirted some dye onto different sections of the yarn, to see how the dyes would absorb and blend on each fibre. Again, some extremely varied results.
LtoR: 16% milk fibre/85% wool, 50% bamboo/50% wool, 60% bamboo/40% wool
The milk fibre yarn took up the dye a lot more than the bamboo, it is quite vibrant and dark. Of the other two, the one with the lower bamboo content seemed to take the colour better, but the one with more bamboo is a lot shinier and has more drape (this could also be due to the spinning method of the yarn as well, the 50/50 blend is a crepe style yarn, which is a bit more dense). The sheen and drape of the bamboo yarn is really lovely.
Once my experimentation was done I kept the two milk fibre skeins as they were and overdyed the lighter bamboo skeins with a silver grey so i could use them in one large project and have them look pretty much the same.

Different Yarn Blends – Milk Fibre and Bamboo Read More »