
Creating repeatable colours – how I record my recipes
A big part of selling hand dyed yarn is being able to produce and sell the same colour. It’s one thing to create colours, it another to properly record recipes and be able to repeat the same results over and over.
There are of course dyers who only produce one of a kind colours, which is fun and creative, but this creates extra work in terms of shop photography and description writing. It also means that if the colour created is something beautiful and popular it is then difficult to go back and try replicate it. So even when I am playing around, I make notes as it could end up being something amazing.
When I started Passioned Flower my intention was to create colours that stemmed from the things that inspired me. I wanted to make colours that represented me and that I could repeat and build on over time. That is why even from the very beginning I recorded the process for each colour that I created.
[embedyt] https://www.youtube.com/watch?v=GkwiFbN-ngw[/embedyt]So what is my process and how do I keep records to make sure I can repeat my colours?
It starts with the dye solution. Each time I make a batch of dye stock I use the same measure of powder to water ratio, I use warm water to dissolve the powder and mix it thoroughly before pouring it into their storage bottles. Next is the water in the dye pot. I measure the water and the vinegar into the pot, recording the quantities and other details, like if the water is heated before starting, or if I start with cold water. Sometimes I add colour to the water first, other times the yarn goes in and then the dye is added. All of these small factors can have a large impact on the end result.
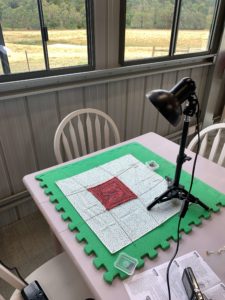
At each step I write down what I do – in a notebook – I can write, scribble, draw images of how the yarn is laid out and on which sections I place dye. In some cases, when I have a very clear idea of what I’m going to do I may even pre-write out the dye steps and colour mixes and then adjust or edit these as I see how the yarn is turning out.
Often I will mix colours before adding them to the pot. As I have explained previously, I use only 14 dye powders and create colours by mixing the stocks together. Each new colour is written down, detailing the amount of each used.
At each stage I take photos and write comments on my notes. This has led to the creation of other colours, as sometimes along the way I create a colour that I would like to use for something else or in a different way.
Once I have finished dyeing, the colour is set and the yarn is dried. It’s really only after the yarn is dry that you can see the finished colours properly. This is when I knit a sample with the yarn (the same sample I knit for each of my colours). I decided that I wanted a slightly interesting pattern, so that one day I might be able to turn all of my samples into a blanket. I use the motif from the Bloom Shawl. It is a fairly quick square that shows off the yarn in lace and also in plain knitting. The sample is for a few reasons; to see how it looks worked up; to keep a record of the colour as reference for the next time I dye it and to use on my website as the colour swatch.
At this point the colour may be finished and ready to become part of my range or I might want to try again, making some adjustments to get the colour just how I want it. Of course this then requires more notes, and another sample.
Once I am happy with the colour I then record all of the details in OneNote. Each colour is sorted into an inspiration category and has its own page where I list out all of the details that I jotted in my paper note book. I also upload photos and draw in diagrams using colours and arrows to record every detail I can about how I created the colour. The reason I try to make these as detailed as possible is because it might be a long time between dyeing up a particular colour, so in order to get it as similar as possible every detail and step needs to be done as close to the original version as possible.
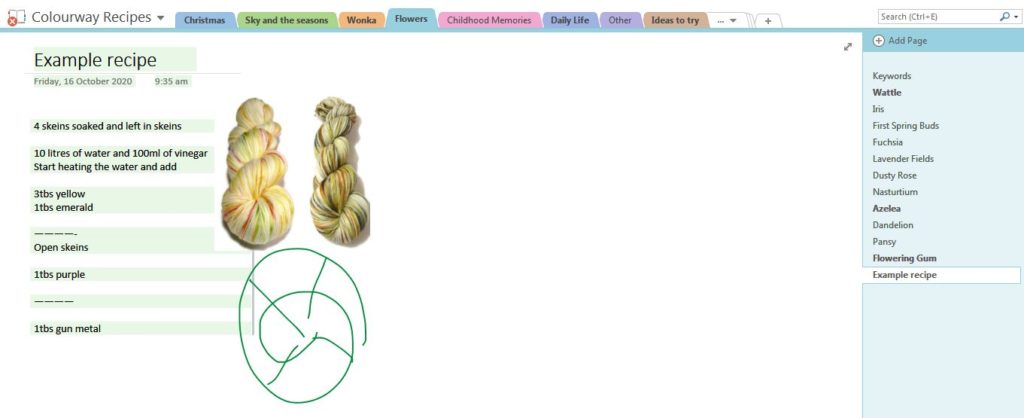
When I am dyeing from a recipe, I use my iPad to read the OneNote files. I can set the iPad above my dye pots, so I can easily see it as I work. I can then also flick between recipes as each colour is saved by its colourway name. I keep my original paper notes safely in my desk, away from the mess of water and dye. Every scribble and note made it kept in case I ever need to refer back – either to double check that I am following the right steps or to use my notes to create something new.
Creating repeatable colours – how I record my recipes Read More »